
Over the holidays, I shared a photo of Ella's big Christmas present, a dollhouse, on my Instagram feed (@kozyandco). So many of you were interested in the details, that I thought it was due time for a little post on how this semi DIY project came together.

A few months ago, I settled on the idea that I wanted to gift our girl with a dollhouse this year. She's taken a real interest in dolls, and babies in particular, so I knew it was something she would enjoy and play with for years to come.
Originally I loved the idea of having Mike build one for her... I loved this plan from Young House Love, and this one by Ana White... but on the end, I decided that I wanted a house with a more classic feel. It needed to look like an actual house on the outside. I wanted doors, and windows... something that was pretty to look at from both the front and the back sides... so I set out looking for just that.
I adored this dollhouse from Pottery Barn Kids, but the price tag was a little high for my liking, so the search continued.

Finally, I stumbled upon this house by Melissa and Doug, and the wheels began to turn!
I loved the shape and style of this house, and the layout inside was nice too. It came with the furniture, which was also wooden, so that was a plus too. I liked that it was constructed of mostly wood, and not plastic or particle board... it had good bones, and I just knew that it was the perfect house to put a little DIY spin on, and make our own.
It was a bit of a pain to put together... think IKEA furniture... pieces everywhere, but I did manage to do it myself without Mike's help, so I can't say that it required too much skill.

Next up, it was on to some fresh paint. I like pink and purple, but Ella's room is decorated in peach, pink, mint, pale yellow, gold and gray... so the colors kind of clashed, and I am totally OCD about matching.
I used a black chalk paint to do the roof, a white high gloss paint by Martha Stewart to paint the trim, and "Beach Glass" paint from the same line, in a satin finish, to paint the actual exterior of the house. I opted to leave the doors the original pink color, because I liked the way it looked with the aqua, and to be honest, they would have been a huge pain to paint.

The interior is still a work in progress at this point. I didn't want to finish it all at once, so that I would have time to decide if I wanted to do some painting on the inside, or add flooring... it's sort of become an addiction... almost like renovating your own home. Big decisions to be made!

For now, I wallpapered a few rooms, and some of the furniture, using beautiful floral paper from Rifle Paper Co. and mod podge, and used some super cute Project Life cards that I found on clearance at Michael's to hang as artwork throughout the house.
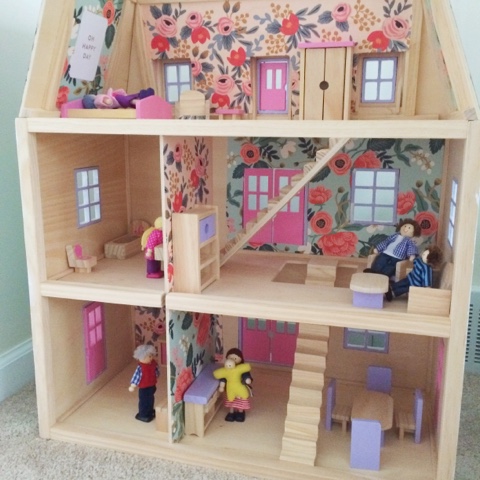
The dolls are also by Melissa and Doug, and both Ella and Max have been having a lot of fun playing with them in the house.
I fully intend to update this post as we continue to make "renovations" and changes, but for now I just wanted to share the details on the materials that we used.
This was a lot of fun to work on, and I'm really happy with the way it is coming together so far!


This is absolutely amazing!! I never would have thought to do-over a new dollhouse, what a fun idea. I was a huge fan of dollhouses growing up and now I'm looking forward to doing this with Maddie when she gets a little older :)
ReplyDeleteThank you sweet friend! It has been super addicting and fun to work on!
DeleteI love it! Thinking what colors I could do?
ReplyDelete