Showing posts with label DIY. Show all posts

Wednesday, June 15, 2016

Dark Chocolate Pretzel Sea Salt Bark


You know how there are just some combinations that seem like they were destined for each other?  Like peanut butter & jelly, and ketchup and mustard?

That's kind of how I feel when sweet and salty items are paired together... as though the sweetness of chocolate, paired with the crunchiness of pretzels and the saltiness of coarse sea salt are a match made in Heaven.


Recently, I was standing in the checkout line at Target of all places (shocker, I know), and I grabbed a bag of chocolate pretzel bark during a moment of weakness.  Naturally, it was so delicious, that I was hesitant to share it with my kids, and wanted to hoard it all for myself... but it got me thinking about how simple it would be to make my own version at home.

You guys, this "bark" could not be easier to make.  It is so delicious that you will want to eat it all yourself, but coincidentally, it would be great to package up and give as a gift... if you can bear it.


Ingredients


1 pkg of Ghirardelli dark melting wafers

2 cups of pretzels
coarse sea salt

Directions


melt the chocolate according to the instructions on the package (there is a microwave and a stove top option).

place pretzels in a large ziplock bag, and crush them with a rolling pin.
on a baking sheet, lined with a silpat or parchment paper, pour half of the chocolate, and spread it into a thin even layer with a spatula.
sprinkle the crushed pretzels on top of the chocolate while it is still warm.
top with remaining chocolate, and gently spread it, so that it coats the pretzels.
sprinkle sea salt on top (use as much or as little as you like).
allow to cool, and then break into non-uniform pieces.


xoxo

Wednesday, June 8, 2016

Chocolate Mint Iced Coffee


If you know me at all, you are well aware of the fact that I am coffee-obsessed.  As in don't-even-talk-to-me-until-I've-had-a-cup obsessed... I mean, hello, I have three kids ages three and under, so without coffee and wine, I'm honestly not even sure how I would survive.

Over the last few years, I have become particularly fond of the iced variety.  I generally like to start my day with a hot, freshly brewed cup, then it's onto the iced stuff by the afternoon.


In the summer months, iced coffee rules my world, and I love to experiment with different flavors.

Recently, we planted the potted herb garden that resides on our back deck for the next few months. This included basil, cilantro, parsley, rosemary, and mint... which got me thinking about some fun new ways to use these plants, besides the more obvious uses for them.


I've really taken a liking to infusing things... infused water, infused liquors, and then it dawned on me, why not attempt an infused simple syrup.

Simple syrups couldn't be easier to make, and they're a lot of fun to experiment with and use in different ways... cocktails for one, and then of course, in my favorite iced beverage.

So, out to the deck I went, where I grabbed a small bunch of fresh mint.  I wasn't specific with measurements here, because the way I see it, if you want things extra minty, grab a big bunch of mint... prefer just a hint of minty flavor? Go with a smaller bunch then.


Then it was on to making the mint infused simple syrup...

what you need

1 bunch/handful of fresh mint leaves
1 cup of sugar
1 cup of water

instructions

Literally, throw all 3 ingredients into a saucepan (wash the mint first of course) and bring to a boil.

Reduce to a simmer, stirring occasionally until sugar is completely dissolved.
Allow to cool, and then remove the mint leaves from the syrup.
Transfer into a container, and store in the refrigerator.

Okay, so I had my minty simple syrup, and now it was time to make something with it.  What pairs well with mint you're wondering?  Well, chocolate of course!

So here's how I threw together the chocolate mint iced coffee...

what you need

ice cubes
cold coffee or your favorite cold brew
chocolate syrup
mint simple syrup (recipe above)
creamer of choice (milk, half and half, almond milk, what have you)

instructions

Throw some iced cubes into a glass (I prefer pint sized mason jars).
Drizzle in some chocolate sauce.
Add some of your minty simple syrup (use your judgement here. How much you use depends on how sweet you like your coffee.  I use about a tablespoon, because the chocolate sauce adds some sweetness already).
Pour in the coffee
Add the desired amount of creamer, and if you're feeling really fancy, garnish with a couple of fresh mint leaves.

Sip and enjoy!


I have been drinking this concoction for about a week now, and I'm already brainstorming some other fun flavors to test out in terms of infused simple syrup.  I'll be sure to share if I come up with some good ones!


What's your favorite way to drink coffee?

xoxo

Tuesday, May 24, 2016

DIY Painted Handle Spoons


You guys, it's been awhile since I posted a good DIY project.


I haven't had much time lately to take on anything elaborate in terms of craft projects, but this one is super simple and yields some great results.


These painted handle spoons are a fun way to make your utensils match your kitchen decor, and coincidentally they also make for great gifts.

What you'll need

Non-toxic acrylic paint (I like the Martha Stewart brand)
Wooden or bamboo spoons
Painters tape
A paintbrush
Sandpaper (optional)

How to:

-I used some sandpaper to rough up the ends of the brushes where I intended to paint. I'm not sure if this helps the paint to adhere, but figured it couldn't hurt (that's why this step is optional).

-Apply painters tape to the end of the spoon where you wish to paint.

-Get to painting. You will want to apply at least a couple of coats to get good coverage.

-Allow to dry.

-Remove tape.

-Allow them to cure for a few days, then spray with clear shellac spray to seal.

*** I never put these spoons in the dishwasher and always wash my spoons by hand.


See, super simple and super cute right!  Just the way I like a project to be these days!
xoxo

Saturday, May 14, 2016

Swoon Worthy


Ah, it's finally the weekend again.  This past week we were blessed with some beautiful weather and it felt so nice to get outside and enjoy it... We went on long walks, played in the yard, and had dinner and popsicles on the back deck.  It was pure Heaven I tell you.

As is typical here in the Northeast in the spring time, the weather fluctuates, and this weekend is going to be a bit cooler, but I just know those sunny warm days will be here to stay before we know it.

Things are still a little hectic around here, yet slowly but surely I'm beginning to get a handle on everything, even if that means that some days I just have to throw in the towel in regards to plans, and go with the flow instead.

There are so many things that I want to blog about at the moment, but my schedule just hasn't allowed for it, so I'm keeping a running list, and hope to start tackling some of these posts as it becomes possible for me to do so.

Thankfully my kids allowed me a short amount of time in front of the computer this week, and I was able to put together this Swoon Worthy post!  So, these are the things that I'm crushing on lately...

1.  You might think I was still pregnant if I told you how much I love pickles.  I stumbled across these  super convenient/healthy snack packs recently at Target, and I seriously can't get enough.

2.  Speaking of getting outside to play, our latest obsession is this form of sidewalk chalk.

3.  A friend of mine recently turned me on to this hair product line, and I'm so glad she did, because this stuff is my favorite!

4.  Super comfy maxi dresses will always be a warm weather staple in my closet... when I found this one, I had to have it!

5.  Now that gardening season is upon us, I figured it was the perfect opportunity to throw it back to one of my favorite DIY projects!

6.  My love affair with amazing small businesses that handcraft the most adorable items for babes continues... this boutique is one of our new favorites!

7.  I'm totally intrigued by this whole smoothie bowl fad.  I think I might have to try one this weekend!

8.  I'm pretty sure I've shared about these shoes before, but they are seriously my favorite for kids in the summertime.  Ella just got her first pair, and Max wears his religiously.

9.  Swooning over this pretty flowy tank (that also happens to be nursing friendly!).

10.  This blogger shares some of the most amazing recipes, but this one for iced chocolate mochas left me drooling for sure!

Have a fabulous weekend!
xoxo,


Friday, May 6, 2016

Maple Pecan Granola


Now that I am no longer pregnant and allowing myself to indulge in anything and everything, I have been trying to eat a little healthier and get back on track in terms of diet.

My current addiction is yogurt parfaits... Vanilla flavored Greek yogurt, topped with granola, fresh fruit, and a drizzle of either honey or real maple syrup.  I eat this for breakfast, lunch, snack... you name it, and I've even gotten my husband and kids hooked too.


I was buying granola from the store, and though it was good, one day I decided to try my hand at whipping up a batch on my own, at home.  After researching countless recipes on Pinterest, I mixed and matched some techniques to come up with my own recipe, and since I'm pretty happy with the way it came out, I thought I'd share the details of what worked out to be some pretty tasty granola, here on the blog.

It's super easy to make, and aside from parfaits, could be eaten a number of ways.


I hope you enjoy it as much as we do!


Saturday, April 2, 2016

Swoon Worthy

{picture from Homegoods}

We're off to a bit of a late start around here this morning... sadly, no, it's not because I am in labor... yet anyways... but it's certainly not for lack of trying to get things started.

Max hasn't been feeling so hot and has been keeping us up the last few nights with an awful cough, and I am just so beyond pregnant at this point, that we're all moving a little bit more slowly.

My mother in law has been here with us this past week, and it has been a pure slice of Heaven.  She has read M&E a gazillion books, taken them on walks to the park, given them their baths, played "red light, green light" too many times to count, and on top of all of that, done my dishes, folded my laundry, and allowed me to get some very much needed rest.  The woman is my hero right now, and we will be sad to see her go... especially before our little man arrives, since he seems to be taking his sweet time.


With all of that being said, I finally found the time to sit down at my computer and share the list of things that I am currently swooning over.  So here we go...

1.  This facial cleanser is my latest obsession... really, I love the whole line, but this stuff is truly amazing.

2.  How cool is this super simple recipe for unicorn bark? I need to make this with my kids ASAP.

3.  I've had a lot of friends ask me for book recommendations lately, and although I haven't had much time to read recently, my first instinct is always to say anything by Liane Moriarty... I absolutely loved this book, this one, and this one too.


4.  I know I have posted about these lettuce wraps before, but we had them for dinner again this past week, and they are so good, I just had to share them again.

5.  Um... do these espadrilles come in my size?

6.  These days, I honestly can't live without this stuff.  Washing my hair everyday?  I ain't got time for that!

7.  Weekends call for waffle bars... which is just what we indulged in this morning!

8.  I can't wait for this baby to arrive so we can test out these pacifiers and these amazing pacifier clips.

9.  Peanut butter s'mores pie... drop the mic, that is all.

10.  I know, I know... another throw blanket.  I have an addiction, I cannot be stopped.

Hoping you all have a lovely weekend!

Friday, March 18, 2016

Swoon Worthy

Another weekend is here, and at this point, for me, I feel like it's just a little game of crossing yet another couple of days off of the calendar.  My due date is less than three weeks away now, and I'd be lying if I said I wasn't ready to be D-O-N-E... but I'm sure no one wants to listen to my incessant complaints about being HUGELY pregnant at this point, so on to much lighter and happier things!

Here's the list of things that I currently swooning over...

1.  Tassels, and pom poms, and so much color... I had to have this bag... and I'm pretty sure that through today, all accessories, clothing and shoes are buy one get one 50% off, so now is the time to buy!

2.  I love a good blueberry muffin recipe... especially when it comes along with a super cute printable recipe card.

3.  Bright colors and fun prints are my favorite, so when I came across this dress, I just knew that Ella had to have it.

4.  Businesses that give back are ALWAYS the ones that I enjoy supporting.  I am obsessed with these  super soft swaddle blankets, and for every item purchased from this company, they donate a blanket to a child in need.  XOve Baby was also kind enough to offer my readers 25% off your purchase, now through April, if you use the code: KOZY at check out!

5.  This Easter treat combines so many of my favorite things!

6.  Did you guys happen to catch this super easy DIY project that I posted the other day?

7.  This stuff is my latest beauty obsession!

8.  Well, this is the type of Easter egg that I can totally get on board with.

9.  I cannot wait for maxi dress season.  This one is so gorgeous!

10.  This recent salad recipe discovery is EVERYTHING!!!

Hoping you all have the best weekend!

Wednesday, March 16, 2016

DIY iPhone Case


I finally upgraded my iPhone recently... I know, welcome to 2016... and naturally since the size of my phone changed, the iPhone cover that I had been using on my previous phone, wouldn't fit on my new one.

So, I hopped online and started shopping for a new case, and though there were a ton of amazing options, I wasn't so thrilled about the prices.  $40 for a case just seemed a little ridiculous to me... so I decided to take matters into my own hands with this super simple and inexpensive DIY project!


Materials
Clear iPhone case (I got mine here)
scissors
exacto knife
scrapbook paper (I used leftover Rifle Paper Co. paper I had from Ella's dollhouse DIY)
pencil

Instructions
Trace the outline of the phone case on paper of your choosing with a pencil.
Using scissors, cut out your iPhone shape.
Place paper into case, design facing out.
Using an exacto knife, cut out the opening for the camera.
Place phone in case on top of paper.

Enjoy your awesome and super inexpensive iPhone case, and make a bunch more so that you can switch out the design whenever you feel like it!


Saturday, February 20, 2016

Swoon Worthy


Happy weekend, friends.  This past week seems to have flown by and dragged all at the same time.  My oldest was on break from school, and the earlier part of the week was beyond freezing and a little snowy, so needless to say, we spent a lot of time at home in our pj's.

It finally warmed up a bit toward the end of the week, so we managed to sneak out to Target and Trader Joe's to stock up on some of our favorite things/scope out spring collections.

It's hard not to have spring on my mind at the moment, while inching closer and closer to my due date with baby number three, but we're trying our best to take things one day at a time around here.

Here's what I'm swooning over lately...

1.  I swear if I didn't have to work, and didn't have children or a house to take care of, I could watch Fixer Upper all day and night. I love this list of farmhouse finds from Target. They just scream Fixer Upper style.

2.  I've confessed my love for the Nose Frida several times on this blog, but have you guys seen their newest product?  Genius!

3.  I know a certain sprinkles obsessed little boy (and his mom), who would think this is a pretty amazing idea.

4.  With Easter being at the end of March this year, I'm thinking it may be time to decorate for spring pretty soon.  Looking for some inspiration?  This was one of my favorite DIY projects to date!

5.  Dying over how cute these little ballet flats are!

6.  I'll be making these this weekend... I like to add a little bit of shredded chicken to mine!

7.  These old school letter boards have been popping up all over my Instagram feed, and I kind of love them.

8.  I'm a total sucker for a drug store beauty buy... some things are worth splurging on, and others not so much.  My latest inexpensive obsession is this stuff.

9.  I was totally swooning over this gorgeous spring garland last year, and never got my hands on one... so happy to see they brought it back again this spring!

10.  Finding cute dresses that you can also nurse in, has always been a struggle for me... I adore this one, and it pulls double duty as both a maternity dress and a nursing dress, post pregnancy!

Have an amazing weekend!

Tuesday, February 2, 2016

Shop Small Love: Little Beasties Shop + A DIY Magnet Board

If you weren't already aware, I am a HUGE advocate for shopping small.  There are so many amazing small handmade businesses out there, many of which are run by super talented mamas, that offer a wide array of high quality products, and I love supporting them.


One of our favorite new small business discoveries is Little Beasties Shop.  Jess, the owner, makes the sweetest handmade plush toys out of fabric and felt. Her work is incredible, and her creativity is second to none... just check out this awesome Felt Garden Set.


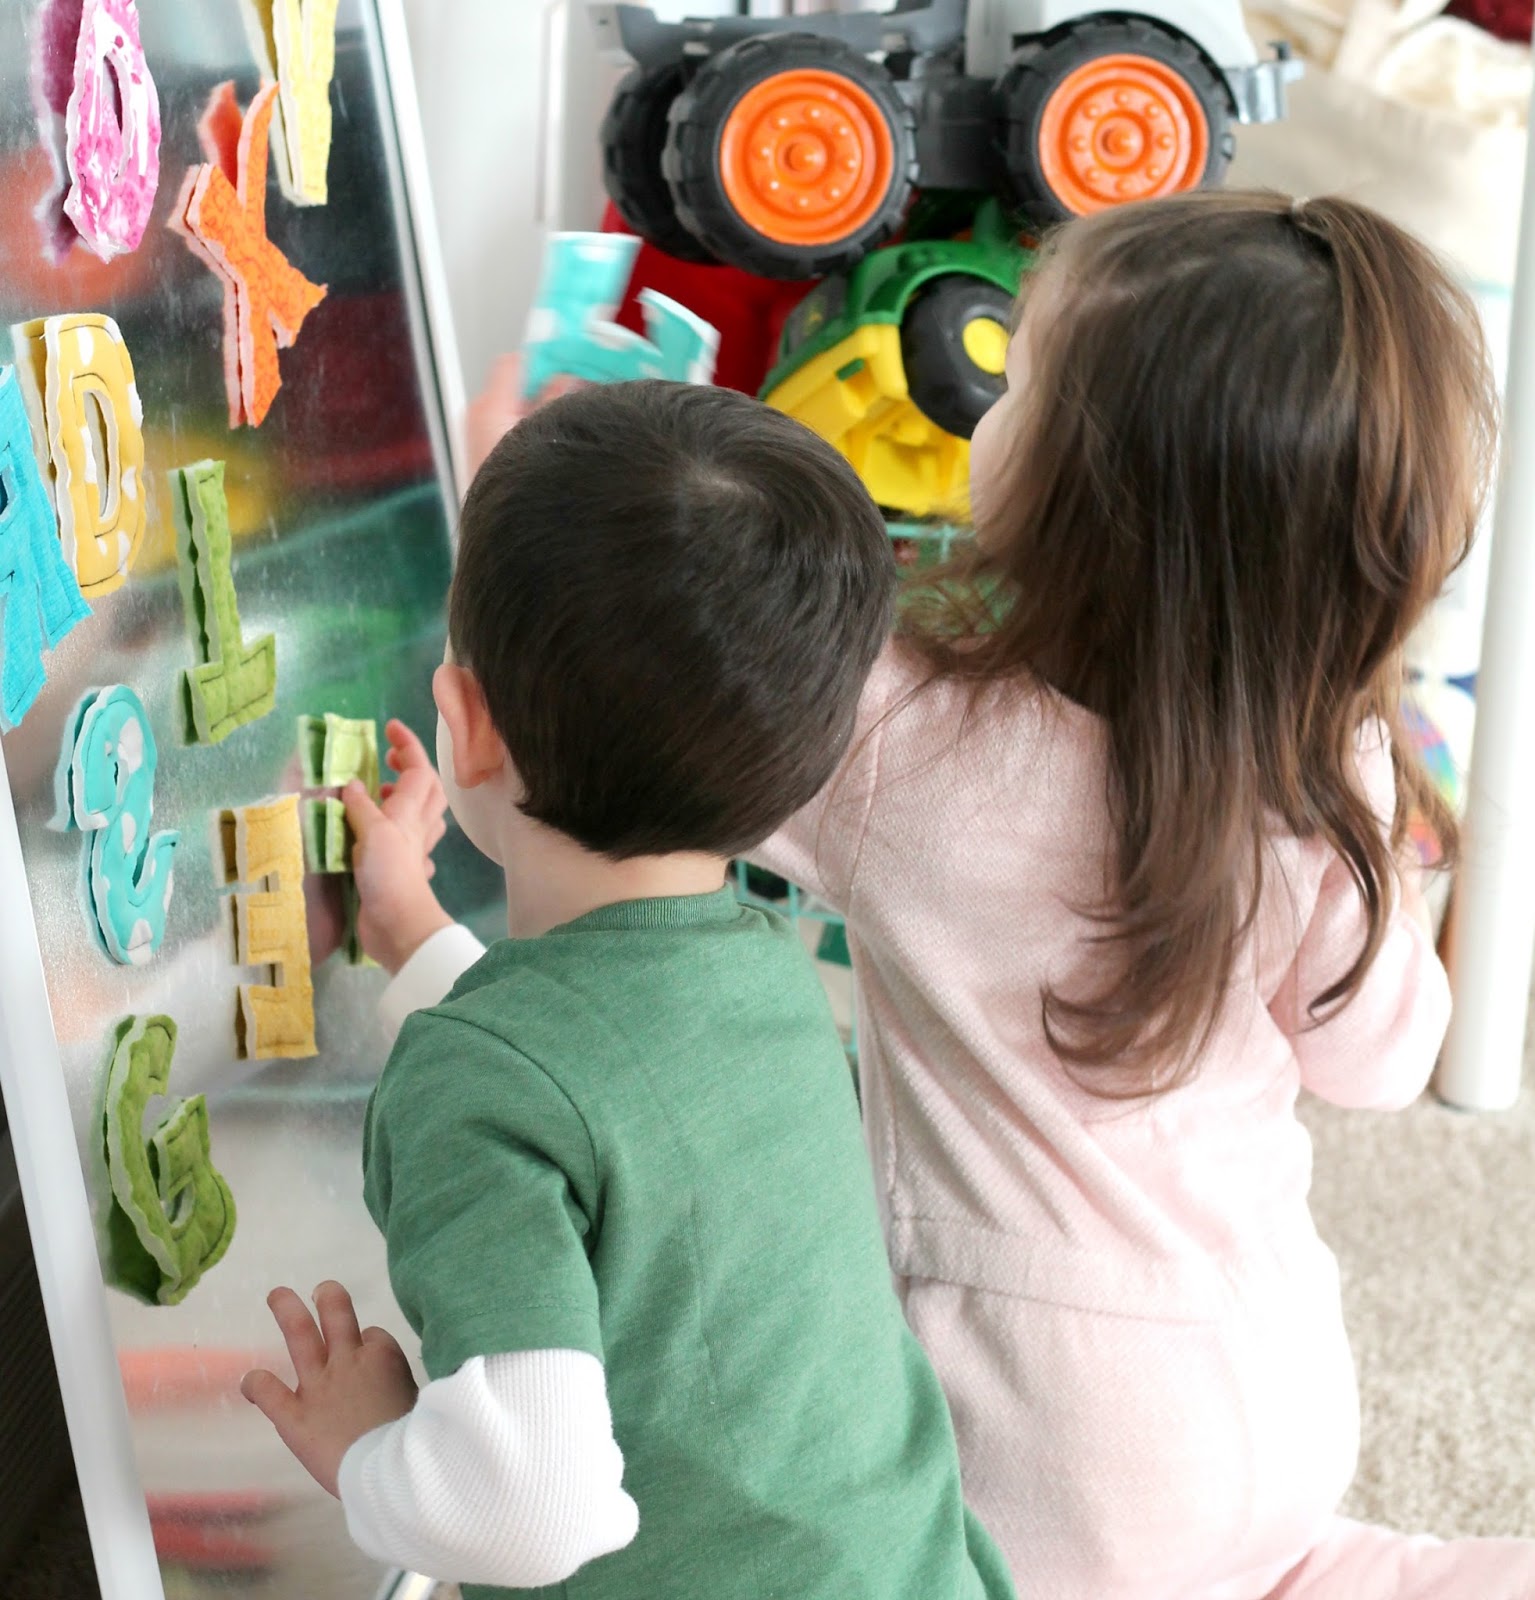
Recently, Jess was kind enough to send over a set of her Magnetic Alphabet Letters, which naturally were a huge hit with Max and Ella!  


The letters are sewn using super soft and bright colored (our favorite) flannel fabric, they are slightly plush, and there are magnets inside, making them perfect to use on your refrigerator, or any magnetic surface.  Their size is perfect for little hands, and we had so much fun practicing our ABC's and spelling out words while we played with them.


The quality of these letters is impressive, and I could instantly tell that they were durable enough to withstand the roughness of toddlers/little ones, so I know they are a toy that we will have around for a long time.

Seeing as our refrigerator is stainless steel... aka non-magnetic, our amazing new set of letters from Little Beasties Shop got me to thinking about adding a decent sized magnet board to our playroom.

M&E received a set of magnetic animals for Christmas, and now this set of alphabet lettersso I just knew a magnet board would be the perfect way to display and play with our new toys.


I originally considered using magnetic paint to make a board that could also serve as a chalkboard, but after reading numerous reviews, the magnetic paint sounded like it might be more trouble than it was worth, so I enlisted my husband to help me, and we came up with a much, much easier DIY project.


I purchased the materials at Home Depot and Michael's (using a coupon), and have linked them below.  The entire project cost just over $25.

If you're interested in making a 24"x 36" magnet board like the one pictured in this post, you will need the following materials:

24 inch x 36 inch frame (I purchased this one on white, using a 40% off coupon)

To make the magnet board, we simply removed the cardboard backing from the frame, as well as the layer of plastic that would normally cover the photo/poster going into the frame.  We then used the cardboard backing as a template, and using a marker, we marked what would need to be trimmed from the metal sheet, in order for it to fit in the frame.  It was less than 1/4 inch that needed to be trimmed from both the length and width, and the metal was easy to cut, using just a pair of kitchen scissors.

Then we popped the metal sheet into the frame, and replaced the cardboard backing... and that was it!


A super fun addition to our playroom, and the perfect place to play with our alphabet letters from Little Beasties Shop!


Tuesday, January 12, 2016

Ella's Dollhouse


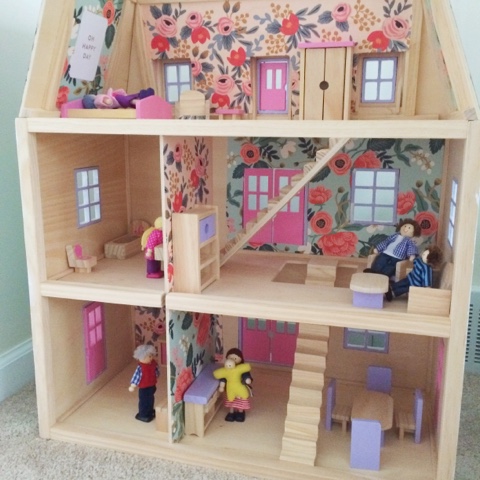
Over the holidays, I shared a photo of Ella's big Christmas present, a dollhouse, on my Instagram feed (@kozyandco).  So many of you were interested in the details, that I thought it was due time for a little post on how this semi DIY project came together.


A few months ago, I settled on the idea that I wanted to gift our girl with a dollhouse this year.  She's taken a real interest in dolls, and babies in particular, so I knew it was something she would enjoy and play with for years to come.

Originally I loved the idea of having Mike build one for her... I loved this plan from Young House Love, and this one by Ana White... but on the end, I decided that I wanted a house with a more classic feel.  It needed to look like an actual house on the outside.  I wanted doors, and windows... something that was pretty to look at from both the front and the back sides... so I set out looking for just that.

I adored this dollhouse from Pottery Barn Kids, but the price tag was a little high for my liking, so the search continued.


Finally, I stumbled upon this house by Melissa and Doug, and the wheels began to turn!

I loved the shape and style of this house, and the layout inside was nice too.  It came with the furniture, which was also wooden, so that was a plus too.  I liked that it was constructed of mostly wood, and not plastic or particle board... it had good bones, and I just knew that it was the perfect house to put a little DIY spin on, and make our own.

It was a bit of a pain to put together... think IKEA furniture... pieces everywhere, but I did manage to do it myself without Mike's help, so I can't say that it required too much skill.


Next up, it was on to some fresh paint.  I like pink and purple, but Ella's room is decorated in peach, pink, mint, pale yellow, gold and gray... so the colors kind of clashed, and I am totally OCD about matching.

I used a black chalk paint to do the roof, a white high gloss paint by Martha Stewart to paint the trim, and "Beach Glass" paint from the same line, in a satin finish, to paint the actual exterior of the house.  I opted to leave the doors the original pink color, because I liked the way it looked with the aqua, and to be honest, they would have been a huge pain to paint.


The interior is still a work in progress at this point.  I didn't want to finish it all at once, so that I would have time to decide if I wanted to do some painting on the inside, or add flooring... it's sort of become an addiction... almost like renovating your own home.  Big decisions to be made!


For now, I wallpapered a few rooms, and some of the furniture, using beautiful floral paper from Rifle Paper Co.  and mod podge, and used some super cute Project Life cards that I found on clearance at Michael's to hang as artwork throughout the house.


The dolls are also by Melissa and Doug, and both Ella and Max have been having a lot of fun playing with them in the house.

I fully intend to update this post as we continue to make "renovations" and changes, but for now I just wanted to share the details on the materials that we used.

This was a lot of fun to work on, and I'm really happy with the way it is coming together so far!

 
Real Time Web Analytics